
Gatsby Cloud-like live previewing for your Sanity website, but low cost with unlimited edits.
View in Sanity StudioUpdated 2020-10-07 | Published 2020-05-18
This guide is specifically for Gatsby websites using gatsby-source-sanity, linked to a repository.
Other source plugins may have similar 'watch mode' functions, and could likely apply the same method.
The Sanity Source plugin for Gatsby has a watchMode feature. See the plugin's guide for details.
When it's working:
gatsby-config.js looks something like the belowwatchMode and overlayDrafts are enabled so long as you're not a production environment.env.development file// gatsy-config.jsconst isProd = process.env.NODE_ENV === "production";module.exports = {plugins: [// ...other plugins{resolve: `gatsby-source-sanity`,options: {projectId: process.env.SANITY_ID,dataset: `whateverYouCalledYourDataset`,overlayDrafts: !isProd,watchMode: !isProd,token: process.env.SANITY_TOKEN,},},],};
All good? Let's go on.
This all works by running Gatsby in development on a live server, as if it were your local environment.
We'll use the newly released DigitalOcean App Platform for this. It's the cheapest, hassle-free Git-deployed solution possible.
I have tried setting this up on AWS, Azure, GCP, and others. None of these come close for this use case.
You'll need an account to get started.
From the DigitalOcean dashboard click Manage > Apps, then Create App. Then link your Gatsby repository to the project.
Choose your region and branch to suit your location, and keep Autodeploy code changes selected so that as your website updates, your live preview does as well.
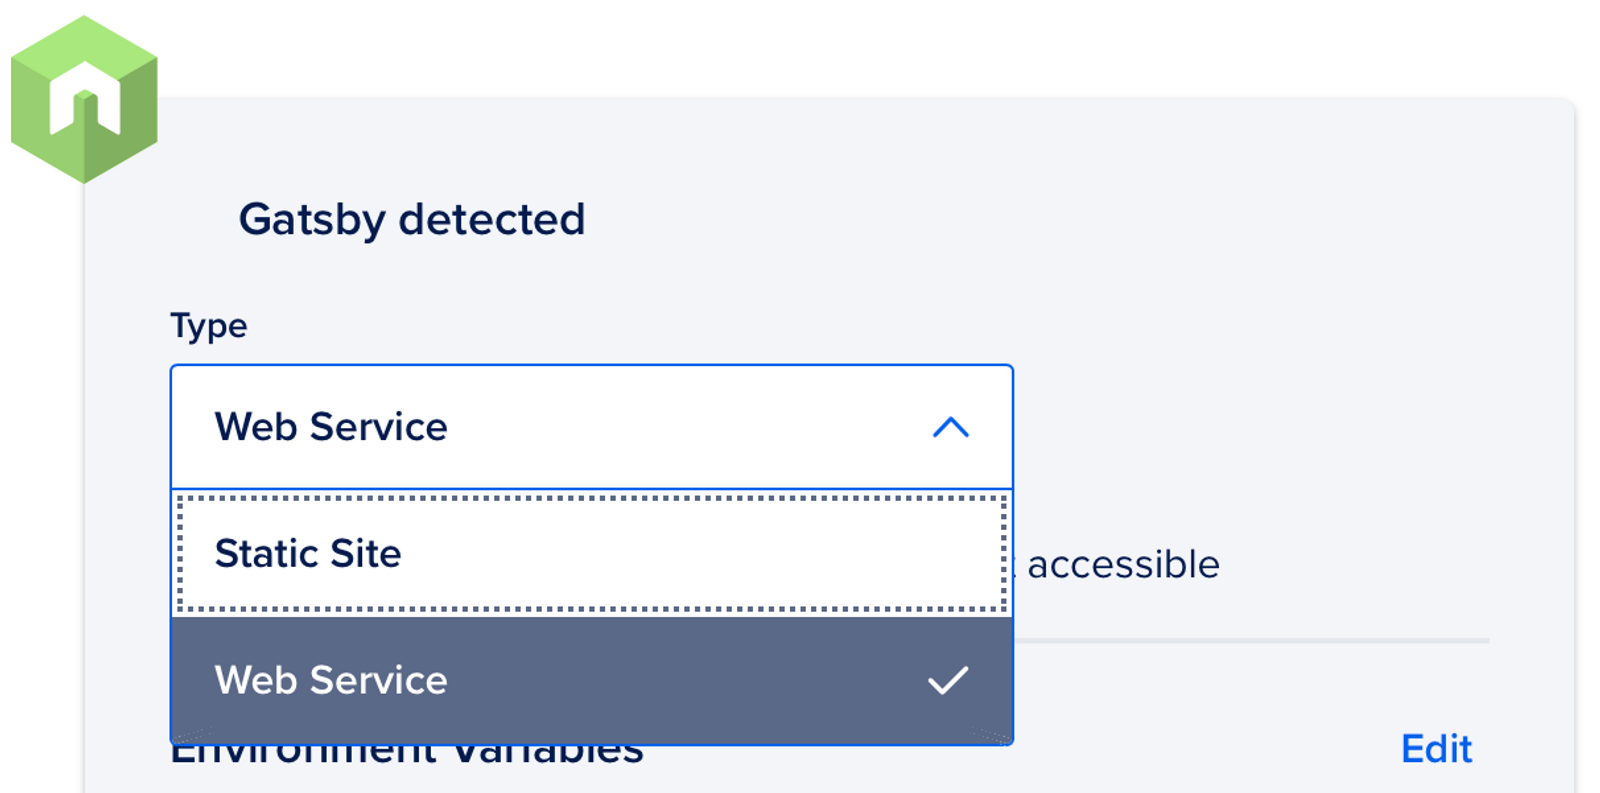
On the next screen you should see "Gatsby detected". Which is great! But we don't want a Static Site, click the dropdown and change to Web Service.
We'll also need to add Environment Variables here.
Add:
SANITY_ID and SANITY_TOKEN as above.NODE_ENV to development, to make the Heroku App run in the right environment.When you deploy changes, it will run the build script first, then launch the development environment running your start script.
DigitalOcean may have detected the right scripts from your package.json file. Here's what my projects have:
"scripts": {"build": "gatsby build","start": "gatsby clean && gatsby develop -H 0.0.0.0",}
(-H 0.0.0.0 gives you a network address during development which is super handy!)
If they're not already filled out, make sure your commands and port look like these:
npm run buildnpm run start8000Choose your pricing. The Basic plan is enough to power the live preview – but not at the cheapest tier. Just below this is a dropdown to change the size of your Container, select the $10/mo option with 1GB RAM.
Click Launch Basic App
Deployment can take awhile. But once finished you can start browsing the Gatsby website, try making edits in Sanity. You should see them updating in real time, no matter whether you're working from your local development version of Sanity Studio or your deployed/hosted version.
Hooray.
With Sanity it's possible to setup a Production Preview URL for your content editors. Which will open the currently edited document in a new window.
However an even nicer implementation is to include a Preview Pane right inside Sanity.
We use the function below for both the Production Preview and Preview Pane iframe.
const remoteURL = "https://example-name.ondigitalocean.app";const localURL = "http://localhost:8000";const previewURL =window.location.hostname === "localhost" ? localURL : remoteURL;export default function resolveProductionUrl(document) {return `${previewURL}/${document.slug.current}`;}
Finally you may want to also ensure the app isn't being indexed by using something like gatsby-plugin-robots-txt.
It has an inbuilt option to produce allow/disallow versions depending on the environment.
Since Gatsby sites can be setup in a near infinite number of ways, perhaps the above didn't work for you. Reach out for help.
A previous version of this guide suggested using a free Dyno on Heroku to set this up. And while it (kinda) worked, Gatsby in development mode would almost always max out the free 512MB RAM allocation.
Plus the server would go to sleep, loading an error the first time content editors viewed the Preview pane. Which is a poor experience.
You could fix this by upgrading your Heroku account, but to get 1GB of RAM is $50/month. And that's crazy.
So while this method is no longer "free", it's not expensive and far more reliable.
Gatsby Cloud is another option to do offer live preview. It works incredibly well and is really simple to setup.
It also launched at a really high price point. There are now $0/month and and $19/month plans – but these only include 100 and 250 edits respectively. Which just entering text into a field can chew up really quickly.
Thanks to Knut for nudging me in this direction.